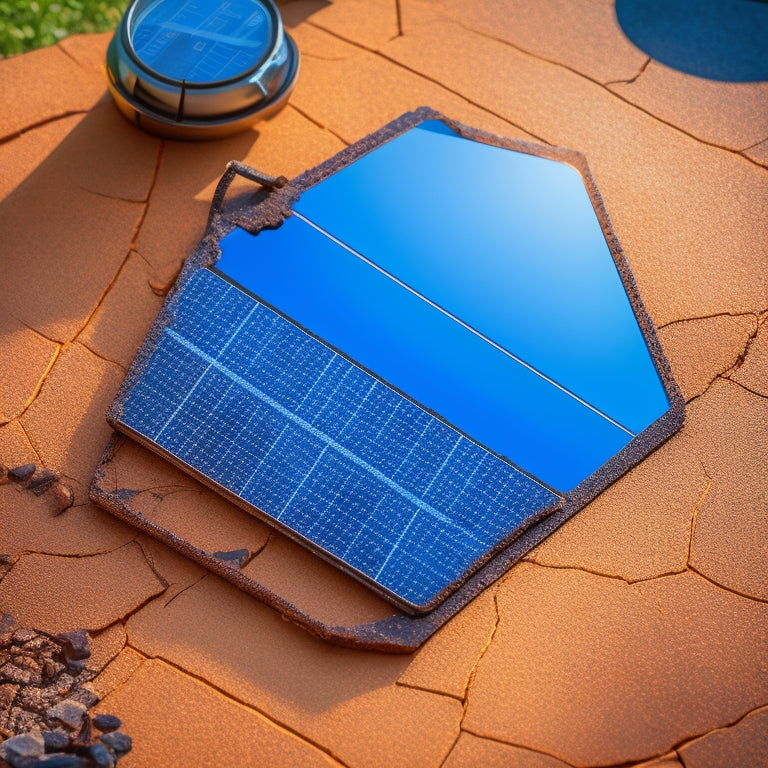
What to Know When Repairing a Cracked Solar Panel
When repairing a cracked solar panel, you'll need to conduct a thorough assessment of the damage, checking for physical and electrical damage, and measuring electrical output to determine the extent of the issue. You'll also need to choose the right tools, including specialized equipment like wire strippers and torque wrenches, and take safety precautions to avoid electrical shock and injury. As you move forward, you'll need to identify and replace damaged cells, verifying they match the original specifications, and then test and maintain the panel to guarantee peak performance. With these critical steps in mind, you'll be well on your way to restoring your panel's efficiency.
Key Takeaways
- Conduct a thorough visual inspection to identify the extent of the crack and potential electrical damage.
- Ensure you have the right tools, including a solar panel repair kit and specialized tools like wire strippers and torque wrenches.
- Take necessary safety precautions, such as wearing PPE and working in a well-ventilated area with the power supply off.
- When replacing damaged cells, match new cells' electrical characteristics to original specifications and ensure secure bonding.
- Test the repaired panel to verify its functionality and performance, and perform regular maintenance to prevent future issues.
Assessing the Damage
Repairing a Cracked Solar Panel
Assessing the Damage
Several cracked solar panels can be salvaged, but first, you need to assess the damage to determine the best course of action. A thorough assessment will help you identify the extent of the damage and decide whether repair is feasible.
Begin with a visual inspection to check for signs of physical damage, such as cracks, broken glass, or corrosion. Look for any signs of electrical damage, like burn marks or overheating.
Next, evaluate the damage severity by checking the panel's electrical output using a multimeter. Compare the readings to the manufacturer's specifications to determine the extent of the damage.
Check for any signs of water ingress, which can cause further damage if left unchecked. Document your findings to create a clear representation of the damage.
This information will help you decide whether to repair or replace the panel, ensuring you get the maximum power output from your solar array.
Choosing the Right Tools
With your assessment complete, you've determined that repairing the cracked solar panel is a viable option. Now, it's crucial to choose the right tools for the job. You'll need a variety of tool types to tackle the repair effectively.
A good starting point is to invest in a solar panel repair kit, which usually includes the necessary materials and tools. These kits often feature specialized tools like wire strippers, crimpers, and torque wrenches. Additionally, you may need to purchase separate tools like a multimeter, pliers, and screwdrivers.
When selecting tools, confirm they're suitable for the specific task at hand. For instance, if you're dealing with a cracked glass surface, you may require a glass repair kit with specialized adhesives and resins. If the damage is electrical in nature, you'll need tools like a wire tester and a soldering iron.
Remember to choose high-quality tools that can withstand the rigors of the repair process. By having the right tools, you'll be well-equipped to tackle the repair and get your solar panel up and running efficiently.
Safety Precautions to Take
Before starting the repair, it's essential to take necessary safety precautions to avoid injuries or further damage to the solar panel.
You'll need to wear personal protective equipment (PPE) such as gloves, safety glasses, and a face mask to shield yourself from broken glass and other debris.
Make certain you're working in a well-ventilated area, away from any electrical hazards, and turn off the solar panel's power supply to prevent electrical shock.
When handling the cracked panel, be cautious not to touch any electrical components or wiring, as they may still be live.
Use a non-conductive tool, like a wooden or plastic scraper, to carefully remove any broken glass or debris from the panel's surface.
If you're not comfortable with heights, consider enlisting the help of a professional or making sure you have a stable ladder and a spotter to assist you.
Remember to inspect the panel for any signs of water damage or corrosion, which can exacerbate electrical hazards.
Repairing or Replacing Cells
Now that you've taken the necessary safety precautions, you're ready to address the damaged cells in your solar panel. Inspect the panel to identify the cracked or broken cells, as these will need to be replaced to restore peak solar efficiency.
Cell replacement is a delicate process, requiring careful handling to avoid further damage. You'll need to disconnect the panel from the electrical system and remove any protective coatings or adhesives to access the damaged cells.
Use a specialized cell replacement tool to remove the broken cells, taking care not to touch or contaminate the surrounding areas. Clean the area thoroughly before installing the new cells, ensuring a secure bond with the existing panel materials.
When replacing cells, it's crucial to match the new cells' electrical characteristics to the original specifications to maintain the panel's overall performance. Properly replacing damaged cells will help restore your solar panel's energy output, ensuring you're generating power at peak levels.
Testing and Maintenance
Recommissioning your solar panel after cell replacement requires careful testing and maintenance to confirm the restored system operates at peak levels.
You'll need to verify that the replaced cells are functioning correctly and that the entire system is performing at its best. This involves monitoring performance metrics such as voltage, current, and power output to guarantee they align with the manufacturer's specifications.
Conduct a series of tests to identify any potential issues, including insulation resistance, grounding, and leakage current tests.
These tests will help you detect any defects or weaknesses in the system that could compromise its performance or safety.
Regular maintenance is also essential for enhancing longevity and preventing future problems. This includes cleaning the panels, inspecting the mounting structure, and confirming that all electrical connections are secure.
Frequently Asked Questions
Can I Repair a Solar Panel With a Cracked Frame?
You can try repairing a solar panel with a cracked frame, but first, you'll need to assess the damage and determine if frame replacement is necessary, as structural integrity is essential for ideal energy harvesting.
Will a Cracked Solar Panel Still Generate Electricity?
You're holding a fragile vase, and your cracked solar panel is like that vase - still beautiful, but its cracked performance is leaking precious electricity output, and you're left wondering if it can still generate power; the answer is yes, but with reduced efficiency.
Can I Repair a Solar Panel With Water Damage?
You can attempt to repair a solar panel with water damage, but it's essential to assess the extent of the damage first. If corrosion is minimal, you can try cleaning and drying the panel, then applying repair techniques like re-laminating or replacing damaged cells.
How Long Does a Solar Panel Repair Typically Take?
You're a skilled builder, piecing together a puzzle of renewable energy. When you begin the repair process, expect 1-5 days of downtime, depending on the severity of the crack, with repair costs ranging from $100 to $1,000, a small price to pay for utilizing the sun's power.
Is It Worth Repairing a Cracked Solar Panel?
You're wondering if it's worth repairing a cracked solar panel; consider the repair cost versus the potential performance impact, as even a small crack can reduce energy output by up to 20%, making repair a worthwhile investment.
Conclusion
Now that you've maneuvered through the repair process, your cracked solar panel is firing on all cylinders again. Think of it like a puzzle, where each repaired cell is an essential piece that completes the image of ideal energy production. Remember to stay vigilant, as even small cracks can spread like a fracture in a windshield, compromising the entire system. By following these steps, you've not only fixed the problem but also secured a brighter, more sustainable future.
Related Posts
-

Solar Power for Community Energy Independence
Solar power is essential for your community's energy independence, offering both environmental and economic benefits....
-
How to Achieve Energy Independence at Home
To achieve energy independence at home, start by investing in renewable energy sources like solar panels, wind turbin...
-
Off-Grid Solar Solutions for Eco-Conscious Businesses
Off-grid solar solutions offer you a path to both sustainability and substantial cost savings. By adopting these syst...


